This will help you in understanding steps to create BTL Non-Media Jobs.
BTL - 1 How to add a BTL- Non-media Job by Brandintelle
Step 1: Open JOBS/BTL Non Media application
Step 2: Go to ‘MY JOBS’ from the left menu and click on create job
Step 3: Fill in all the job details, then click next

Following are the description of details that needs to be filled during job creation
Period From - Day from when the activity will be starting
Period To - Day when the activity will end
Job prepared by - Name of the user who is preparing the job
Job Owner - Select the name of the Job Owner
Job Date - Default same day date will be selected
Job name - Name of the activity for eg. mall events, sponsorship, roadshow
Cost Center - which department is performing the activity
Brand - Name of the brand for which this job is being created
Type - Type of the activity
Campaign - Name of the campaign
Activity - Name of the activity, for eg, Activation and Promotion
Market - Name of the place where the activity will be held
Select Target Group - Select Target audience according to the activity
Description - Brief summary of the activity
Vendor - Name of the Vendor
Estimate no.- Enter Estimate/Bill number
Place of Supply - State name where the activity will be performed
Creative Agency - Select name of the creative agency
Allow PO amount to exceed job amount - If PO amount should exceed job amount, please select the check box.
Step 4: Click on ‘New’ in the sub activity page
Step 5: Fill the mandatory details in the sub activity page and click on 'Save'
Step 6: Further, you can review and edit the sub activity details which were added in the previous page. Also, a new sub activity can also be added by clicking on the ‘New’ button.

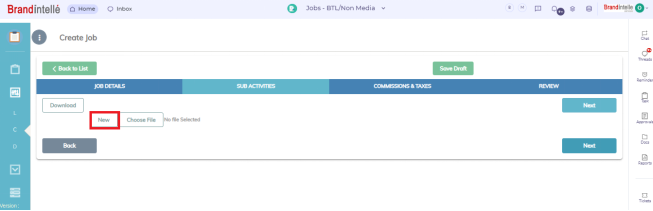
Step 7: Instead of adding the sub activity manually, you can also download the template of the sub activity by clicking on the ‘Download’ button and can edit the details in excel sheet.
After filling the sub activity details in excel sheet, you can upload the same sheet using ‘Choose file’ option. Click on the ‘Next’ button to move ahead.

Step 8: Enter Commission and Taxes details, post entering the details you will get an updated amount with taxes calculated also you can attach supporting documents mentioned as 'Doc type', then click on ‘Next’

Step 9: In the next page, you can review all the details entered in the job, sub activity, commission and taxes. If incase the data is found incorrect, you can press the ‘Back’ button and edit the data.
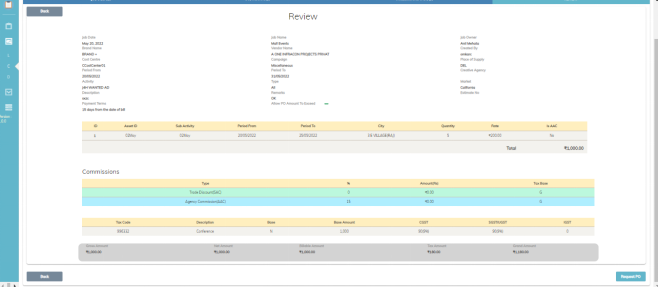
Step 10: After reviewing the details press the ‘Request PO’ button to save the job successfully.
Was this article helpful?
That’s Great!
Thank you for your feedback
Sorry! We couldn't be helpful
Thank you for your feedback
Feedback sent
We appreciate your effort and will try to fix the article